Quickstart
Get CCE running in 5 minutes. Three steps after the installer finishes.
Quickstart
After running the CCE installer (see Installation), do these three steps in order. You only do this once.
Step 1 — Remove PDF Architect 9 (if present)
PDFCreator's installer occasionally bundles PDF Architect 9 even when CCE's installer asks it not to. PDF Architect 9 is a separate PDF editor that competes with Adobe and any other PDF viewer you already have. CCE does not need it. Remove it if it's there.
How to check and uninstall
Press Win and type Apps & Features, press Enter.
In the search box, type PDF Architect.
If an entry appears, click it → Uninstall → follow the prompt. If nothing matches "PDF Architect", you're already good.
Safe to remove. Removing PDF Architect 9 has no effect on PDFCreator (the virtual printer CCE depends on) and no effect on Adobe Acrobat / Reader.
Step 2 — Configure PDFCreator (Save mode + Target directory)
This is the most important step. Without it, CCE cannot run — every print job will pop a save dialog instead of being processed.
Open PDFCreator's settings
Open the Start menu → search for PDFCreator → launch it.
In PDFCreator's main window, click Profiles (top-left tab).
In the Save section on the left, click Add action if no save action exists, or click the existing save action to edit it.
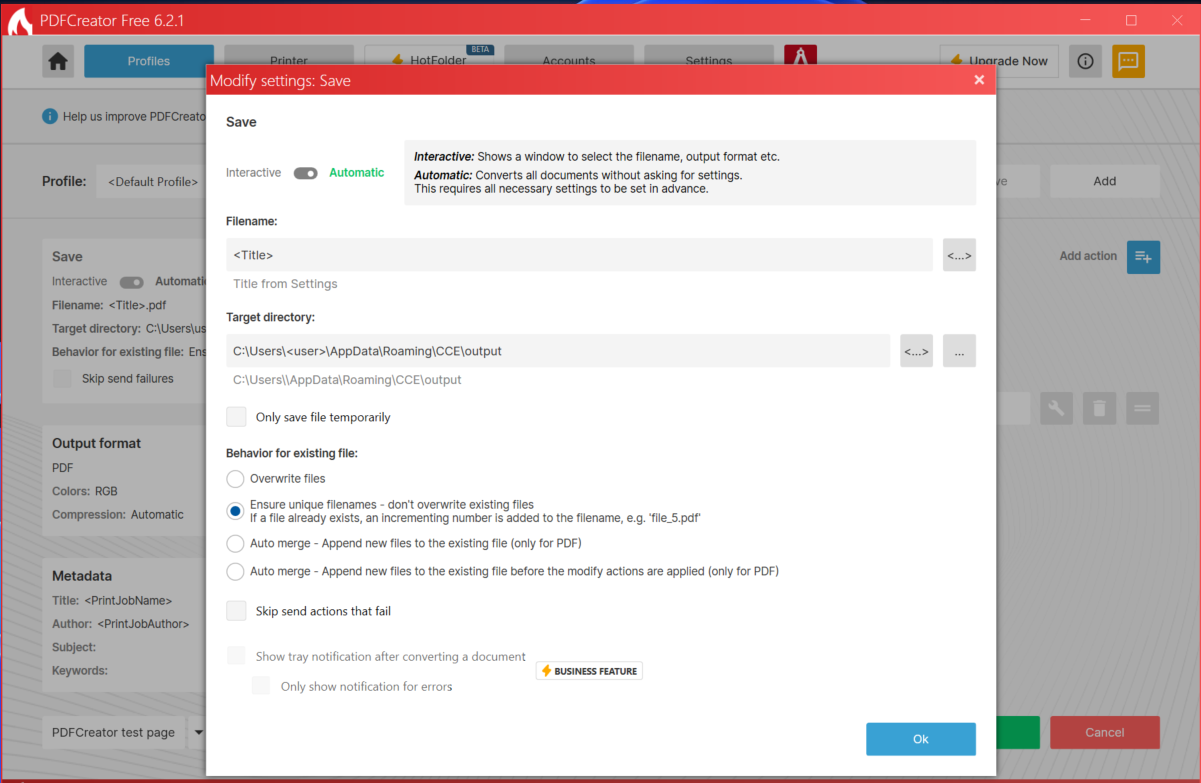
You should now see a dialog titled Modify settings: Save that looks like this:
Set these values
Match the dialog exactly to the screenshot above:
| Field | Value |
|---|---|
| Interactive / Automatic toggle | Automatic (slider to the right) |
| Filename | <Title> |
| Target directory | C:\Users\<YOUR-USERNAME>\AppData\Roaming\CCE\output |
| Behavior for existing file | Ensure unique filenames |
| Skip send failures (left sidebar) | checked |
Pasting the Target directory: use your own username in place of
<YOUR-USERNAME>. A reliable shortcut: copy %APPDATA%\CCE\output
exactly into the field, then click OK. PDFCreator expands %APPDATA% for
you. Verify after closing/reopening that the field shows the expanded form.
Save and exit
Click OK in the Save dialog, then OK again on the Profile settings window, then close PDFCreator entirely (right-click its system-tray icon → Exit) so the values are flushed to disk.
Step 3 — Test print
Now confirm CCE picks up new print jobs end-to-end.
Open any PDF you don't mind printing — your last contract, a structural report, a colored handout.
In your PDF viewer: File → Print → set the printer to CCE Printer → click Print.
The CCE icon will flash and a notification will tell you the job was processed (e.g. "3 pages kept color, 5 converted to B&W").
The processed PDF will open in Adobe (or whichever app handles .pdf)
for review.
If you see the notification AND the processed PDF opens, CCE is working.
What if step 3 doesn't work?
See Troubleshooting. The most common cause is the Save settings in Step 2 not taking — re-open PDFCreator and verify the Target directory field actually shows a path (not blank).
What's next
Right-click the tray icon → View Report → ⚙ Set Cost per Page so the report shows real dollars saved.
Understand what each part of the install does.
Fixes for the handful of issues you might hit.
Common questions about CCE answered.